
 Welcome and thank you for stopping by! I'm so enjoying Kari's party and I am so happy that she has decided to host such a wonderful event again! I'm often asked how to make a decorative bow so I thought that would be the perfect thing to share with you all today! Start with a length of ribbon and floral wire (for the small bow here I used about 18 inches of ribbon and about 12 inches of wire).
 Make a small loop at one end of the ribbon and hold tight with your thumb.
 With the tail of the ribbon, make a twist at the base of the loop and hold with your fingers.
 Bring the tail to the other side of the original loop.
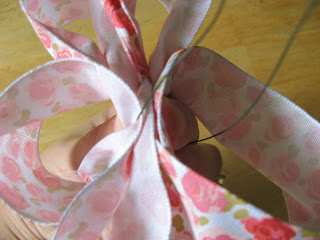
 Twist the tail (if using a one sided patterned ribbon, make sure the pattern is facing up).
 You should now have the original center loop and two loops on either side. Continue to create loops on each side of the center by twisting and bringing the tail from one side to the other. I usually create 5 - 6 loops on each side (the one shown here is much smaller).

Be sure to leave a long enough tail so that you can create two even sized finished ends. Once you are done with your loops, take the remaining tale and bring the bottom up to the underside of your bow. Hold securely.
Take the floral wire and feed it through the large loop you have just created and bring it through the original center loop.

Twist the wire securely at the base of your original loop (on the underside so you won't see it).


24 comments:
what a pretty little blog - love the key necklace - I just returned from a flea market shopping spree with a tin filled with about 60 skeleton keys - (its on my blog - a few posts back)
so I'll be trying something similar with crystals and pearls -
thank you for visiting
xox - eb.
Oh I love your blog. It's so very pretty...
Love the blog, i will be back!! And i have a thing for keys, lol...love them.
such a great tutorial.. thank you for sharing with all of us, I shard my passion for writing on my blog! come and see.. so happy to meet u!
Thank you Karla, the bow tutorial is wonderful!!!!
Yes, very lovely blog....and great tutorial...I'll try this!
At last I'll be making presentable bows for Christmas! Thanks!
Aaaack! How about I send you all my packages at Christmas and you can make the bows for them. LOL!
I try... I really do try! Mine always look like a 2 year old made them.
I must have fat thumbs. or something.
heh heh... thanks for the tute! Maybe I'll be able to make better bows now!
Thanks for stopping by today & thanks for the bow tutorial!
Love everything about your blog ~ I'm such a ROSE girl myself.
Thanks for the instructions on making the prettiest bow! I have always struggled with getting it so that all the printed side of each ribbon is facing the way it is suppose to.
Have a wonderful day and thanks for visiting my blog. Hope you won't mind if I add you to my links?
Love your blog. I will be stopping back. I'm a new blogger and need all the help I can get to make mine as pretty as yours
Very sweet! My mother-in=law is so great at making bows - maybe I just needed a tutorial like yours! Very intrigued by your dieties and divinities swap!!
Sarah
Thanks for the tutorial. Have to try it out.
The artful blogging is so wonderful! I am loving reading all your post and really love your jewerly! You are soooo talanted!
Thank Karla for the bow "how to". I honestly stink at making bows. LOL! Gorgeous ribbon by the way! ;)
XO,
Jenn
What a lovely blog and the vintage necklace is a prize! I love the tutorial, I use to make bows with a friend for her buisness...one year we made 1000 at Christmas for the stores. I was happy to see that end!
Thanks for posting pictures with this! My bows always look sad. I'll have to try again with your tutorial as mu guide.
It's so hard to make a good bow - thanks for the tutorial.
You make it look easy! And I love the ribbon you used too!!
I just found your blog through Shabby! Very nice! Your demo is well done!
I love ribbon! I can't get enough of it! I even do Silk Ribbon Embroidery. For a brief period of time, I used the bow making tools, and then tossed them for using my own hands. I love the tactile!
Did you ever learn the grosgrain ribbon napkin ring Martha Stewart shared in Good Finds? It was many years ago. I think it is still linked on her web site.
So, much beauty here! I will be back!
kj
Love it! Say, now we are ready for beautiful bows for the coming cold weather festivities and projects! ; )
Thank You Karla!
Hugs,
Mary
Beautiful Bow! You make it look so easy! I think I need more practice....
Thanks for the fantastic bow tutorial. I always have my mom make my bows because I just can't get it right! I am now ready to give it another try!
Great bow! TFS!
I'm still partying...
Post a Comment